The Hardest Day - August 18th, 1940
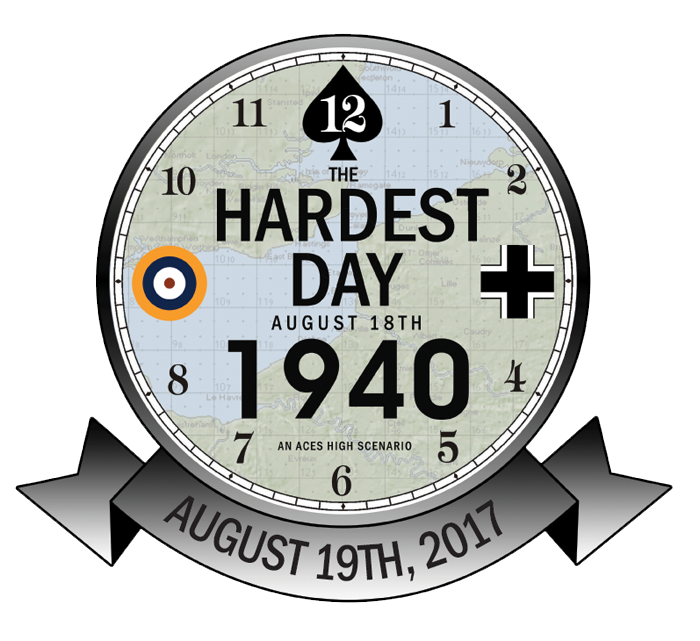
August 18th, 1940
The war had finally followed the Royal Air Force back home from across the Channel. For over a month now the Luftwaffe had been gradually turning up the heat on Fighter Command. It started in July with attacks on passing English convoys and then to naval bases. It then quickly progressed to coastal airfields and night raids. Suddenly the war that the Royal Air Force had fought desperately in France had arrived to their home airfields as very large raids began on August 13th under German operation Adlerangriff (Eagle Attack). The next 5 days would see the largest aerial battles ever seen in history at the time, culminating in the heaviest fighting of the entire battle on August 18th 1940, where both sides suffered their highest losses incurred in one day during the entire campaign.
On the morning of August 18th, the weather was clear and sunny and the Luftwaffe was coming off a day of relative rest flying only recon and harassment missions on the 17th. They had seen very high losses on the 13th, 15th, and the 16th. On this day the Luftwaffe would focus on the main sector airfields at Biggin Hill, Kenley, and North Weald. They also attacked the airfields at Gosport, Hornchurch, Ford and Thorney Island, and a radar station at Poling Hill. The British were following the raids as they built over France and were tracking six groups overall. Fighter Command 11 Group scrambled nearly 100 Hurricanes and Spitfires from over 9 different squadrons to meet the early raids.
Bombers from KG 1 and KG 76 attacked RAF airfields at Biggin Hill, Kenly and North Weald while Ju 88s and Do 17s also attacked Biggin Hill and West Malling. Ju 87 Stukas from StG 77 and StG 3 attacked RAF airfields at Ford, Thorney Island and Gosport. Do 17s of KG 2 attacked Hornchurch while He 111s from KG 53 attacked North Weald. Dornier 17s of KG 76 attacked Kenley in a daring low level raid causing significant damage closing it for several hours. While the attacks on Biggin Hill caused significant damage and destroyed several aircraft on the ground, Biggin Hill never closed. Later In the afternoon, the weather prevented North Weald and Hornchurch from being damaged in attacks by KG 2 and KG 53.
The Stuka attacks at Ford, Thorney and Radar Station Poling were very accurate destroying several Fleet Air Arm aircraft on the ground and destroying the Radar at Poling. However the Stukas of StG 77 paid dearly afterwards losing 15 Stukas along with 26 killed and 6 captured. The Bf 110s of ZG 26 also paid a heavy price that day, losing 12 that day including 5 in one engagement after the raids on Kenley and Biggin Hill. The Luftwaffe lost 71 aircraft to all causes that day along with a painful 94 killed, 40 Captured and over 25 returning wounded. It marked the end of Stuka operations over England and began the decline of Bf 110 in the fighter role as well.
Fighter Command also suffered heavy losses that day with at least 27 fighters shot down with 10 pilots killed and 19 wounded. The Luftwaffe managed to destroy 29 aircraft on the ground but only 8 were Fighter Command Hurricanes and Spitfires, the majority were Fleet Air Arm aircraft at Ford, Gosport and Thorney Island where the most damage was done to the airfields and surrounding buildings. Dornier 17s of KG 76 managed to destroy 3 hangars and 8 Hurricanes at Kenley after a daring low level attack.
The fighting on August 18th ended up being the most costly day for both sides during the Battle of Britain. The defenders had won the day, but at a price that they could not withstand for long. Once again, we are pulling a page out of the history books set where the Battle of Britain was far from over and the fate of England hung in the balance. It would be a day that would be remembered by Britain and the Royal Air Force as “The Hardest Day” of the Battle of Britain.
Overview
Welcome to the Hardest Day - August 18th, 1940. This scenario will be a representation of that day’s events using historical missions and squadrons from that exact day in the air war over Western Europe. This event will encompass all the major Aces High time zones and allow pilots and squads from all over the world to participate in an event that will span the frame of 12 hours!
That’s right, this scenario will last 12+ hours from 12 PM Eastern to sometime after 12AM Eastern.
The CM Team will rotate staff to monitor uniforms and perform the necessary scenario tasks to make this the longest event ever ran in Aces High. The design will incorporate some changes in standard scenario gameplay to ensure the battle spans the entire 12 hours. The event will be broken into three 4-hour phases where specific objectives will have to be hit within those time phases.
There will also be 10 minute flight windows that will open and close every hour to allow all pilots to fly multiple missions during the event. Ideally, each phase of the scenario will have a command staff that will all cooperate together throughout the event and will work together to accomplish the objectives of the scenario.
Registration
An extensive list of Royal Air Force and Luftwaffe historical squadrons have been compiled to choose from for this event. The available units will start with No 11 Group and No 12 Group (RAF) and Luftflotte 2 and 3 (Luftwaffe). Not all these units were active on this day in history, but have been added for group leaders to select from for registration.
Before public registration opens, command staffs, squad leaders and group leaders will be contacted to select from this list of Allied and Axis squadrons. The squad and group leaders will be given time to privately or publicly assemble their squadrons for the scenario. When public registration opens the historical squads that were chosen before it will be shown on the registration page for all pilots to join. Squads will also be allowed to be formed after registration opens.
Squad size will be limited to 12 pilots.
Uniforms
A pilot must be in one of the official uniforms to launch. Pilots will be repeatedly asked by setup CMs and if the player does not have an official uniform from the roster then they will be grounded or if necessary removed from the arena. Event staff will be provided with a list of all active squads to access during the event to confirm squad status. Squad size may not exceed 12 pilots at any time during the scenario.
Lots of time and effort from several different members of the Aces High community was put into gathering information and putting together the available units for us to choose from. Please try to keep you and your squaddies in proper uniform at all times and respect the men that wore these uniforms before us.
Walk-ons
Walk-on players are allowed and welcome to join the arena at any time. They are however required to be in an official uniform as soon as possible. They will not be allowed to launch if not in proper uniform and will be grounded if they launch or ejected if they refuse to respond. All walk-ons will be directed to the side with the lowest numbers at that time.
Flight
The active fields for both sides will open once every hour for 10 minutes. The Setup CM will give a 10 minute, 5 minute, 1 minute and Fields Open announcement. Once flight is enabled the Setup CM will give another 10 minute, 5 minute, 1 minute and Fields closed announcement.
The remaining time announcements will be the start and end of each phase of the scenario. At the end of hour 12, Flight will be disabled and logs will remain open till are aircraft are down and the scenario will officially end.
Ordinance Restrictions
The Axis have all the ordinance restrictions in this event. The Bf 109E-4 and Bf 110C-4b have ordinance disabled to keep them in strictly Fighter or Strafing roles. The Ju 87D-3 and the He 111Hs are restricted to represent earlier variants of each aircraft and their maximum payloads. The Ju 87D-3 is reduced to the payload of the Ju 87B-1 or 2, while the He 111H is restricted to that of the earlier He 111H-2 or H-3.
- Bf 109E-4 – 250KG GP Bomb - DISABLED
- Bf 110C-4b – 2x 250KG GP Bombs - DISABLED
- Ju 87D-3 – 1800KG GP Bomb, 1000KG SAP, 1000KG GP, 1000KG AP, 1000KG SAP, and 2x250 KG Bombs - DISABLED
- He 111H – 2x F5B Torpedoes, 1x 1800KG Bomb, 2x 1000KG Bombs, 1x 1000KG and 1x 835L Bomb Bay Fuel Tank, 2x 500KG Bombs and 1x 835L Bomb Bay Fuel Tank - DISABLED
- He 111H – Gun Package - 6x 7.9 MG 15 – ONLY
In summary, the He 111H is limited to the 8x250KG or 32x50KG Bomb Loadouts, and may only choose the 6x 7.9 MG 15 defensive armament. The Ju 87D-3 will have the 500KG or 250KG and the 4x 50KG loadout only while the 109 and 110 may not carry bombs.
Bomb Site Calibration
Manual Calibration will be used. You can see a very nice tutorial video by Incrypt - HERE
RADAR
Both sides will have the same radar settings. Country Settings are listed below. Everything else will remain unselected. Total displayed value is 137.
Full Friendly – Both sides will be able to see radar contacts for all friendly aircraft.
Tower Enemy – Both sides will be able to see enemy radar contacts located inside radar range of a friendly radar ring above 15,000’ AGL.
Counters Above Radar – Both sides will be able to see enemy Sector Counters (Dar Bar) over the entire map above 500’ AGL.
Radar Update Rate – 2 Minutes (120 Seconds)
Sector Counter Altitude – 500 (Feet) Sector Counters (Dar Bar) will appear above 500’ AGL anywhere on map.
Tower based Radar Range – 24 Miles (126720 Feet) is the range from tower you will see radar contacts above 15,000’.
Fighter and Bomber Warning Ranges – 12 Miles (63360 Feet) is the range from tower a base will begin to flash.
Kill Shooter
Kill Shooter is OFF for the entirety of this event. Friendly kills will be added to the other side’s victory counts.
Icon Ranges
Below 15,000 feet, Friendly and Enemy Icons will be displayed at 3.0K. Above 15,000 feet Friendly and Enemy Icons will be displayed at 6.0K.
Active Airfield Map

Only certain aircraft will be available at certain fields
Historical airfield locations were selected and are available but do to the nature of the setup are not required. Squads are free to be placed and move to any field their aircraft is enabled at during the event at the discretion of the command staff. All airfields are available for landing and rearming.
Royal Air Force Airfields
Only the listed Airfields will be active with the listed Aircraft.
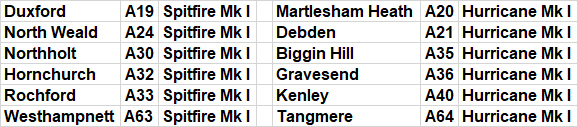
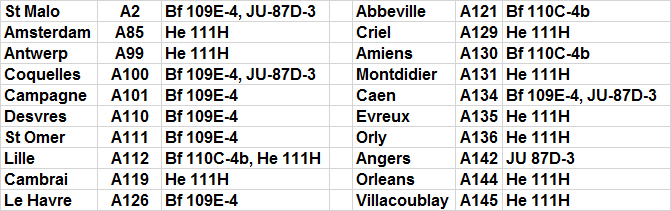
Luftwaffe Airfields
Only the listed Airfields will be active with the listed Aircraft.
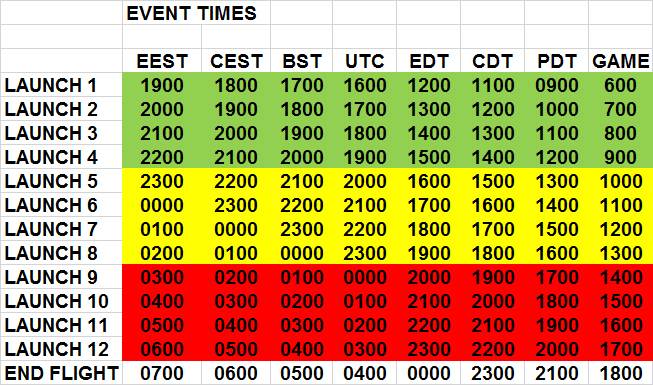
Launch Windows
Aircraft will be able to be launched every hour on the hour for the duration of the scenario. Flight will open for 10 minutes and then close for 50 minutes. Below is a list of Event times by Time Zone and Game clock.
Objectives
To keep the event moving throughout the entirety of 12 hours, the scenario will be divided into three phases. The three phases will be defined as Morning, Midday and Evening. On the game clock, Morning will begin at 0600 and last till 1000, Midday will begin at 1000 and last till 1400, and Evening will begin at 1400 and end at 1800.
Each phase will have its own set of designated objectives. These objectives must be completed during the phases they are set in and will be only scored during their respective phases.
This event will require a rolling command staff, with group leaders and mission leaders that will be able to lead and deliver orders through different time zones. Missions will have to be coordinated by the availability of squadrons and also be planned to meet the time requirements of the objectives. As it was in real life, the day wasn’t always over when the mission ended, some pilots would fly several sorties in one day. This setup is designed to take the strategy of planning and commanding to a whole new level on every level of rank.
Objectives by Phase
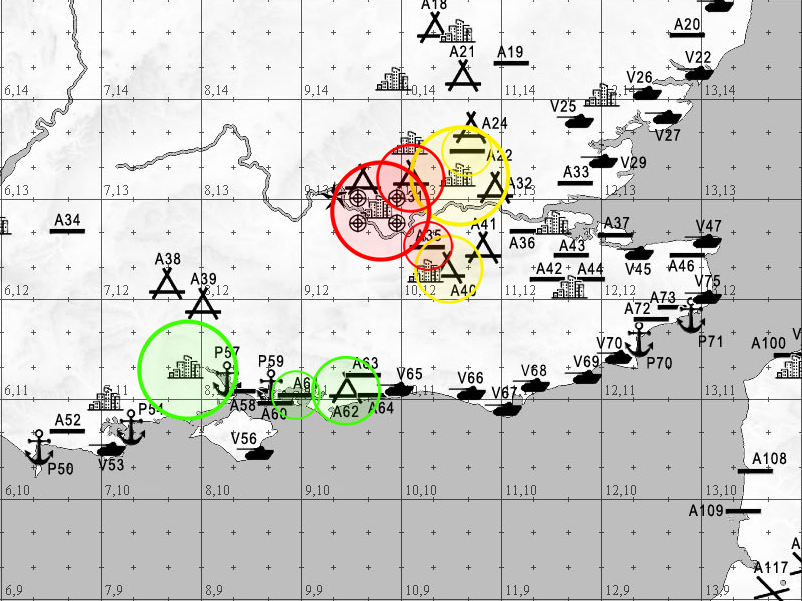
PHASE 1 – GREEN – MORNING (GAME CLOCK 0600 – 1000)
- - SMALL AIRFIELD A61 (8.11.3) – RAF Thorney Island
- - LARGE AIRFIELD A62 (9.11.2) – RAF Ford
- - CITY STRAT (7.11.3) – Southhampton Area
PHASE 2 – YELLOW – MIDDAY (GAME CLOCK 1000 – 1400)
- - SMALL AIRFIELD A22 (11.13.5) – RAF North Weald
- - LARGE AIRFIELD A40 (10.12.2) – RAF Kenley
- - CITY STRAT (10.13.2) – Stratford Area
PHASE 3 – RED – EVENING (GAME CLOCK 1400 – 1800)
- - SMALL AIRFIELD A35 (10.12.4) – RAF Biggin Hill
- - LARGE AIRFIELD A31 (10.3.1) – RAF Hornchurch
- - CITY STRAT (9.12.9) – London Area
The Command staffs must be able to plan missions across time zones and are encouraged to create schedules for mustering and takeoffs. Coordinating with available squads to accomplish the objectives during each phase will be critical but it also allows flexibility to change or re-direct missions. The concept here is to simulate a 1 day battlefield with commanders planning for and making battlefield decisions that could change the entire day’s outcome.
Above is the map of all the objectives, the Green circles represent Phase 1, the Yellow circles represent Phase 2 and the Red circles represent Phase 3. The large circles represent cities, the medium circles represent large airfields, the small circles represent small airfields.
Victory Conditions
Victory will be decided by a formula of scoring categories. Both sides will have goals for each phase and these goals will be given a number value. These numbers will then be totaled at the end of the event to determine who won the event.
Fighter Victories – 1 Point will be given for every 50 fighters shot down by the Luftwaffe and the Royal Air Force.
Bomber Victories – 1 Point will be given for every 25 bombers (He 111H and JU-87D-3) shot down by the Royal Air Force.
Hangars – 1 Point will be given for every 10 Hangars destroyed by the Luftwaffe or Defended by the RAF. Hangars are totaled up at every objective for every phase, any hangar not destroyed at that objective within that phase is considered defended by the Allies.
There are a total of 60 Hangars, 20 per phase.
Ground Objects – 1 Point will be given for every 100 Ground Objects (Not Hangars) destroyed by the Luftwaffe or Defended by the RAF. Objects are totaled up at every objective for every phase, any object not destroyed at that objective within that phase is considered defended by the Allies.
There are a total 1,029 Ground Objects, 343 per phase.
Losses – 1 Point will be deducted for every 100 aircraft lost. A loss is anything other than a successful landing. Returning your aircraft successfully to base is key to victory.
When it is all said and done and the final plane lands, the Logs will be uploaded immediately for viewing and the CMs will begin a review of the raw logs. The logs will then be analyzed for scoring and the results will be posted after a thorough review.
Of course, scores are only one part of the scenario experience, and rarely seem to reflect the fun and overall immersion in Aces High Scenarios. The idea of any scenario is to discover the history, feel the action and drama of the battle, and to experience the entire time and era as much as possible. Scoring is a necessary process to determine a winner and we have tried to create the fairest possible solution for the outcome of the scenario.
Summary of Settings
- TERRAIN: BOB40
- Icon Range – 3.0K below 15,000, 6.0K above 15,000
- RADAR – SEE ABOVE RADAR RULES & SETTINGS
- External view for bombers (F3) - On
- Friendly Collisions - Off
- Enemy Collisions - On
- Kill Shooter - Off
- Fuel - 1.0
- Ack - 0.2
- Formations - Enabled
- Bombsite calibration – Manual Calibration
- Stall Limiter - Enabled
- Visibility - Default
- Object Downtime – full (200)
- Object Hardness – Default
- Winds – None
- Day – 18
- Location Degree Latitude – 51.0030
- Location Degree Longitude – 1.2758
- Month – 8
- Night Length – 12
- Time Zone – 0
- Year – 1940